In previous post we've created a simple Spark app, and used Scalatest to check that it actually works. Even though we were creating a SparkSession with a local master node, it feels quite different from how usually Spark applications are run - on a massive cluster, consisting of many executors, that might come and go. So this time let's get a bit closer to the "production state".
Starting cluster using Docker
Luckily for us, Dockerhub already has an image for us to use. First step - pull it, using
docker pull apache/sparkAfter you've downloaded the package, starting master node is quite simple:
docker run -p 9090:8080 -p 7077:7077 -it apache/spark /opt/spark/bin/spark-class org.apache.spark.deploy.master.MasterLet's take a look at this command in a bit more details.
-p 9090:8080 - each Spark instance runs a Web UI, using port 8080. We want to access this UI from localhost, and we map it to 9090, as there will be more than one Spark instance running, and obviously they all can't use 8080.
-p 7077:7077 - 7077 is a Master port, that workers (separate instances) will use to connect to Master.
/opt/spark/bin/spark-class org.apache.spark.deploy.master.Master - after starting container, we'll execute Master class
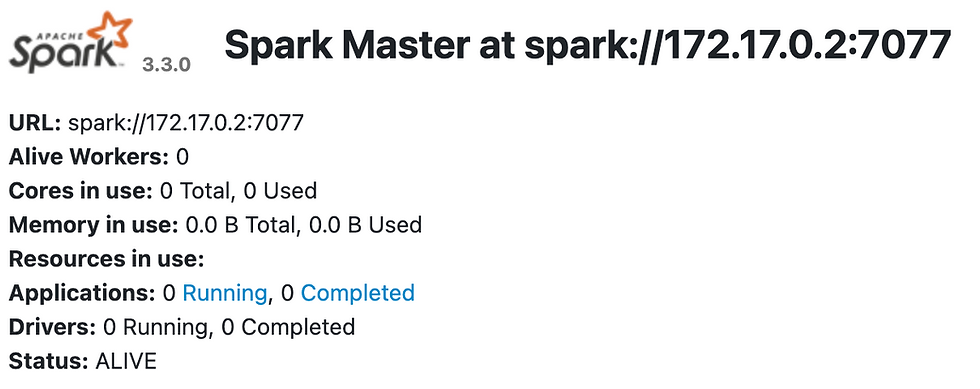
Now you can open http://localhost:9090/ in your browser, and see such UI:
Only a master node without any workers can't do much for us - master only distributes job, and doesn't work itself.
We'll need to start at least one more node - now, a worker - to do the actual work.
Starting a worker would be slightly harder, than master, though not by much.
First thing you'll need to do is to create an empty directory, that worker node will use to store application data. Now - start a new Spark instance, and connect to it:
docker run -v /Users/username/sparkwork:/opt/spark/work -p 7000:7000 -p 9091:8080 -it apache/spark /opt/spark/bin/spark-class org.apache.spark.deploy.worker.Worker spark://172.17.0.2:7077What's new here? Let's see:
-v /Users/username/sparkwork:/opt/spark/work - first part of the argument is directory that we've created for worker to use. We map it to /opt/spark/work inside Docker instance.
-p 7000:7000 - we expose Worker port, so our Master and Worker can communicate.
/opt/spark/bin/spark-class org.apache.spark.deploy.worker.Worker spark://172.17.0.2:7077 - we run a Worker process, and provide it ip / port of Master node, so it knows can register with it, and accept work.
Master node should indicate that Worker was successfully connected in it's UI:

Now our mini-cluster is complete, we can submit our application to it, and see it executed.
Submitting our job
For this post I will assume that you've started from the previous one, and you've got basics of the project outlined. We just need to add one more object, that we'll use to start and submit our application.
Let's create a main runnable class for this:
import org.apache.spark.SparkConf
import org.apache.spark.sql._

object WhApp {

  def main(args: Array[String]): Unit = {

   val config = new SparkConf()
   // path to jar, that will be submitted to Spark cluster
  .setJars(Seq("./target/scala-2.12/sparkling_2.12-0.1.0-SNAPSHOT.jar"))

    val spark = SparkSession
      .builder
      // app needs to know how to reach Master node
      .master("spark://127.0.0.1:7077")
       .config(config)
       .appName("Warhammer 40k")
      .getOrCreate()
    import spark.implicits._

    val testData = Seq(
      WarhammerUnit("Orks", "Trukk", "Red", 12),
      WarhammerUnit("Orks", "Trukk", "Blue", 12),
      WarhammerUnit("Blood Angels", "Rhino", "Red", 12),
      WarhammerUnit("Adeptus Astartes", "Librarian", "Ultramarine", 6),
    )
    // we basically do same actions and on the same dataset our test used, and just show the results in the end
    val testDf = spark.createDataset(testData)
    new Accelerator(spark).redGoezFasta(testDf).show()
  }

}
For completeness I'll repeat advice from previous article, that you can also encounter here:
If you would run this test from your IDE, you might get a pretty cryptic error, something like
class org.apache.spark.storage.StorageUtils$ (in unnamed module ..) cannot access class sun.nio.ch.DirectBuffer (in module java.base) because module java.base does not export sun.nio.ch to unnamed module ..Reason for this is Spark using internal JDK class sun.nio.ch.DirectBuffer. Access to this class is restricted, but you can run your unit tests by adding certain VM options:
--add-opens=java.base/java.lang=ALL-UNNAMED
--add-opens=java.base/java.lang.invoke=ALL-UNNAMED
--add-opens=java.base/java.lang.reflect=ALL-UNNAMED
--add-opens=java.base/java.io=ALL-UNNAMED
--add-opens=java.base/java.net=ALL-UNNAMED
--add-opens=java.base/java.nio=ALL-UNNAMED
--add-opens=java.base/java.util=ALL-UNNAMED
--add-opens=java.base/java.util.concurrent=ALL-UNNAMED
--add-opens=java.base/java.util.concurrent.atomic=ALL-UNNAMED
--add-opens=java.base/sun.nio.ch=ALL-UNNAMED
--add-opens=java.base/sun.nio.cs=ALL-UNNAMED
--add-opens=java.base/sun.security.action=ALL-UNNAMED
--add-opens=java.base/sun.util.calendar=ALL-UNNAMED
--add-opens=java.security.jgss/sun.security.krb5=ALL-UNNAMED
More details can be found in this StackOverflow discussion.
Feel free to run your application now, right from your IDE. After several seconds of processing, you'll see results of the run in your logs:
+----------------+---------+-----------+--------+
|         faction|     name|      color|movement|
+----------------+---------+-----------+--------+
|            Orks|    Trukk|        Red|      17|
|            Orks|    Trukk|       Blue|      12|
|    Blood Angels|    Rhino|        Red|      17|
|Adeptus Astartes|Librarian|Ultramarine|       6|
+----------------+---------+-----------+--------+
As usual, all code can be found on Github.
Comments